
Oh well… I am back to blogging later than I came back to backing because I simply missed my dear blogs…
So the example of this post will be the exquisite ganache , or chocolate filling I know and love that I enjoy using as a filling for birthday cakes and decoration.
It works as glaze, as toping as decoration... meaning you can do with it …anything.
The beauty of it is that it can fit any taste…bitter, sweet, milky, flavored…etc.
So I will example the use by a cake recipe , I do often and have fun doing it.
My chocolate fans, friends and customers love that they can pick a nuance of the chocolate taste and get in return a creamy cake with personality.
So here goes:
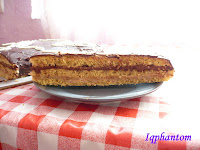
Ganache cake

Standard recipe: 10 slices
Sponge cake, yellow or black , or marble :
5 eggs
5 spoons of sugar
5 spoons of flour (regular)
1 baking powder (2 tsp)
2 spoons of vegetable oil (sunflower)
(for the black cake, substitute one spoon of flour with 2 spoons of dark cocoa)
(for the marble just a teaspoon of cocoa mixed with a spoon of water , add to the mixture and marble it with a fork)
Method:
Sponge cake :
Beat de egg whites until stiff ,add the sugar, keep beating until very stiff . Add the egg yolks mixing gently, the oil and the flour mixed with baking powder.Preheat the oven at medium heat. Grease and line with baking paper a tray. Bake 20-25 min or until the toothpick test. Cool down. Cut in three layers.
Filling and decoration:
1 kg of chocolate (milk, bitter…whatever you like)
800 ml liquid cream
(flavors: rum, brandy, vanilla, nuts, almonds, orange peal, chopped dry fruit, jelly…etc)
Heat the cream close to boiling point (you can use the microwave).Break the chocolate into small pieces (I grounded it) and add it to the hot cream. Mix very well until it resembles a chocolate sauce. Cool at room temperature for 15 min , than in the fridge for 30-40 min, beating from time to time.
When the mixture had reached a creamy consistence remove from the fridge and take out a quantity that you consider it will be enough for glaze and decoration ( I take 1/3).
Add the flavors to the rest.
Start filling the cake from the bottom layer.
Glaze it and dress it up. You can use, decorating tips, fondant figures, fruit…practically anything can turn a glorious recipe in a fabulous cake.
Enjoy.

si
Stanca

Inapoi dupa o pauza lunga
M-am intors la blogging mult timp dup ace m-am intors la facut prajitura …si asta doar pentru ca mi-a fost dor de blogurile mele…si am fost certata de prieteni ca nu le mai dau idei de prajituri.
Acest post va fi despre minunata ganache, crema de ciocolata pe care o prefer pentru umplerea toturilor dar si pentru decorat.
Functioneaza ca si glazura, decoratiuni si practic poti face cu ea …exact ce vrei.Partea frumoasa e ca se potriveste pe orice fel de gust, amaruie, cu lapte, cu arome…etc…
Deci o sa postez exemplul unui tort pe care il fac des si care e foarte usor de facut.
Fanii ciocolatei, prietenii si clientii adora ca pot alege gustul tortului si ca primesc un tort cremos , aromat si personalizat.
Tort Ganache
Reteta standard: 10 felii
Blat de tort alb, marmorat sau negru:
5 oua,
5 linguri de zahar,
5 linguri de faina (obisnuita)
1 paf de copt (2 lingurite)
2 linguri de ulei vegetal.
(pentru tortul negru se inlocuieste 1 lingura de faina cu 2 linguri de cacao neagra)
(pentru tortul de marmura se pune o lingurita de cacao in putina apa si se adauga la compozitia alba marmorand cu furculita)
Preparare:
Se bat albusurile spuma ,se adauga zaharul si se bate in continuare pana se tine. Se adauga galbenusurile ,amestecand usor uleiul si pe rand faina amestecata in prealabil cu praful de copt.
Se coace la foc mediu pe treapta din mijloc 25-30 de minute sau pana la testul scobitorii
Crema Ganache:
1 kg of ciocolata (voi decideti aroma)
800 ml fiscal lichida ( merge si vegetala…sincer nu conteaza de care folositi)
(arome: rom, coniac, vanilie, nuci, migdale, coaja de portocala, fructe confiate, gem de fructe…etc)
Frisca se incalzeste la punctul de fierbere. Ciocolata taiata marunt se adauga in frisca fierbinte si se amesteca pana la omogenizare si se raceste la temperatura camerei 15 min, si in frigider 30-40 min, amestecand periodic .
Cand a atins o consitenta cremoasa se scoate din frigider si se scoate cam ¾ pentru umplutura si se adauga aromele. Restul ramane pentru glazura.
Se umple tortul si de decoreaza…


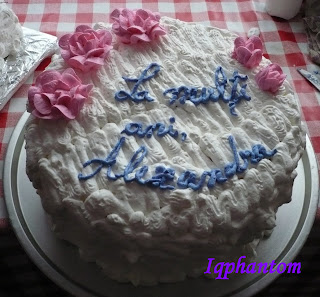
 Torturile inainte de ornare.
 Uite si reteta:
 Se imparte in compatimentele tavii se presara zahar brun deasupra fiecarei gramajoare de aluat si se coace 25 de min sau pana iese scobitoarea curata cand le intepi.