
Almond flavored cake
Now is the turn of a traditional family recipe received from a true lady of the traditional baking ,the former colleague of my sister, mrs. Rodica.
I’m not a very big fan of vanilla cream, though I like the flavor, but combined with almond and chocolate even vanilla cream gets personality.
Sponge cake :
7 eggs
7 spoons of white sugar
1 tsp vanilla essence
7 spoons of regular flour
2 tsp baking powder
Meringue :
6 egg whites
200 gr, white sugar
200 gr. smooth grounded almonds
Cream:
6 egg yolks
200 gr powder sugar
2 tsp vanilla essence
300 gr soften butter
3 spoons of cocoa
1tsp almond oil(you may omit )
Decorating:
70 gr bitter chocolate
Method:
Sponge cake :
Beat de egg whites until stiff ,add the sugar, keep beating until very stiff . Add the egg yolks mixing gently and the flour mixed with baking powder.
Preheat the oven at medium heat.
Grease and line with baking paper a tray. Bake 20-25 min or until the toothpick test.
Cool down
Meringue:
Beat the egg whites. Add the sugar and beat until very stiff. Add the almonds mixing gently. Bake in greased and paper lined tray. Bake 30 minutes at low heat(to dry)
Let it cool.
Cream:
Mix the egg yolks with sugar and vanilla in bain marie until creamy. Cool down.
Cream the butter and add the egg cream gradually.
Split the result in 2.
Mix ½ with almond essence.
Mix ½ with cocoa.
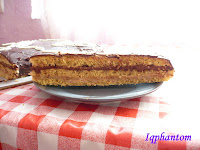
Assembly:
Spread the cocoa cream on the yellow cake.
On top of it put the meringue.
Spread the almond cream on the meringue.
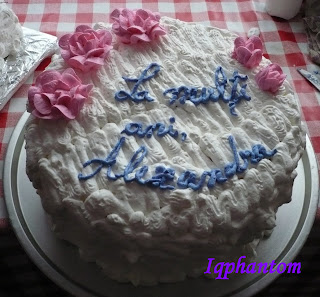
Decorating:
Melt the chocolate in the microwave or bain-marie. Put it in a plastic bag, cut a corner and decorate the cake by your own fantasy.

Now is the turn of a traditional family recipe received from a true lady of the traditional baking ,the former colleague of my sister, mrs. Rodica.
I’m not a very big fan of vanilla cream, though I like the flavor, but combined with almond and chocolate even vanilla cream gets personality.
Sponge cake :
7 eggs
7 spoons of white sugar
1 tsp vanilla essence
7 spoons of regular flour
2 tsp baking powder
Meringue :
6 egg whites
200 gr, white sugar
200 gr. smooth grounded almonds
Cream:
6 egg yolks
200 gr powder sugar
2 tsp vanilla essence
300 gr soften butter
3 spoons of cocoa
1tsp almond oil(you may omit )
Decorating:
70 gr bitter chocolate
Method:
Sponge cake :
Beat de egg whites until stiff ,add the sugar, keep beating until very stiff . Add the egg yolks mixing gently and the flour mixed with baking powder.
Preheat the oven at medium heat.
Grease and line with baking paper a tray. Bake 20-25 min or until the toothpick test.
Cool down
Meringue:
Beat the egg whites. Add the sugar and beat until very stiff. Add the almonds mixing gently. Bake in greased and paper lined tray. Bake 30 minutes at low heat(to dry)
Let it cool.
Cream:
Mix the egg yolks with sugar and vanilla in bain marie until creamy. Cool down.
Cream the butter and add the egg cream gradually.
Split the result in 2.
Mix ½ with almond essence.
Mix ½ with cocoa.
Assembly:
Spread the cocoa cream on the yellow cake.
On top of it put the meringue.
Spread the almond cream on the meringue.
Decorating:
Melt the chocolate in the microwave or bain-marie. Put it in a plastic bag, cut a corner and decorate the cake by your own fantasy.


Prajitura cu aroma de migdale
De aceasta data e randul unei retete cu traditie in familia mea dobandita de la o doamna adevarata a bucatariei, fosta colega a surorii mele ,d-na Rodica.
Nu prea sunt eu fana a prajiturilor cu crema de vanilie desi imi place aroma ,dar in combinatie cu migdalele si ciocolata chiar si crema de vanilie capata personalitate.
Blat :
7 oua
7 linguri de zahar tos
1 vanilie(1 lingurita de esenta)
7 linguri de faina
1 praf de copt (2 lingurite)
Bezea :
6 albusuri
200 gr, zahar tos
200 gr. migdale fin macinate
Crema:
6 galbenusuri
200 gr zahar pudra
2 lingurite de esenta de vanilie
300 gr unt moale
3 linguri de cacao
1lingurita esenta de migdale(se poate omite )
Decor:
70 gr ciocolata amaruie.
Preparare:
Blat:
Se bat albusurile spuma,se adauga zaharul si se bate in continuare pana se tine. Se adauga galbenusurile amestecand usor si apoi cu treptat faina amestecata cu praful de copt .
Se incalzeste cuptorul pe treapta din mijloc.
Aluatul se pune in tava unsa si tapetata cu hartie de copt.
Se coace 20-25 de minute sau pana iese scobitoarea curata.
Bezea:
Albusurile se bat spuma tare.Se adauga treptat zaharul si se bate in continuare pana spuma e foarte teapana. Se adauga migdalele macinate amestecand foarte usor.
Se pune in tava unsa si tapetata cu hartie de copt.Se coace la foc mic 30 minute in lerul preincalzit.
Se raceste.
Crema:
Galbenusurile se freaca cu zaharul si vanilia in bain marie (pe abur) pana devine o crema groasa.
Se raceste.
Se spumeaza untul si se adauga treptat crema de oua.
Crema se imparte in 2 parti.
½ se amesteca cu esenta de migdale.
½ se amesteca cu cacao.
Asamblare:
Blatul galben se unge cu crema de cacao
Deasupra se aseaza bezeaua .
Bezeaua se unge cu crema de migdale.
Se topeste ciocolata la microunde sau in bain-marie.Se pune intr-o punga de plastic care se taie la un colt.Se decoreaza tortul dupa fantezie.
Tip: esenta de migdale "taie" din dulceata prajiturii.
Sfat pentru ce-i care nu tolereaza gustul(pentru ca sunt cativa care mie imi sunt foarte dragi si lor li se adreseaza sfatul):
Inlocuiti migdalele cu nuca sau alune si nu puneti esenta de migdale.
Prajitura e la fel de fina dar putin mai dulce.


 Torturile inainte de ornare.
 Uite si reteta:
 Se imparte in compatimentele tavii se presara zahar brun deasupra fiecarei gramajoare de aluat si se coace 25 de min sau pana iese scobitoarea curata cand le intepi.